Showing posts with label gifts. Show all posts

Thursday, November 21, 2013

Corduroy and Plaid Dress

It's been a long time since I posted anything. I was kind of surprised that my last post was only three months ago. It seems like it's been longer.

I have been crafting, as usual. I've had birthdays and Halloween and Christmas prep. Also, I've been doing NaNoWriMo - again. And I started a new blog about writing, though I've been slacking a little there, too.

Alas, this is always my busiest time of the year. The time of year when I do too much. And then add a little more on top.

Over the next few weeks, I'm going to try to post some of the projects I've been doing over the last few months (and maybe even the year - who knows).

Today, I'm sharing this cute little dress I made for my niece, who is one and adorable (adorableness kind of goes without saying, but I'm saying it).

So, last Christmas, I promised my sister I'd make her little girl a dress...and then I forgot. And because she knows how busy I can get, she didn't say anything. But then I remembered a couple months ago (pre-Halloween), felt terrible and put it on my "To Do" list.

On Sunday, I finally got around to it.

I used McCall's Pattern # M5791, which I've used once before...years ago! It was the first dress I'd ever made. I liked it - but I think this dress turned out much better.

I constructed the little pinstriped section down the front myself.... (fabric and flower buttons from JoAnn's).


And then made the skirt longer with the plaid panel at the bottom.


I also only looked at the instructions once or twice to make sure I had the seam allowances right. Proof that I kind of know what I'm doing now. Huzzah for me!

Wednesday, February 13, 2013

DIY Valentines


We usually don't do anything for Valentine's day, but this year we were invited to a Valentine's Day party (!), so I decided to step outside my comfort zone and make some Valentines!

Madeline and I combed over my Valentine's day Pinterest board and she wanted glowsticks! (What kid doesn't, right?)

There were a couple of examples of the ones with a 'heart' - I decided to make my own in Inkscape (you can have a generic one for free HERE). Some scissors, two hole punches and a glowstick later - voilĂ , homemade valentines!


For Evie's, I came up with something of my very own! Since I usually don't have good paper-craft ideas, I was very excited about this.

All you need is a balloon and a piece of ribbon. One hole punch at the bottom and pull the opening of the balloon through the hole and tie the ribbon around it.


You're probably wondering, "Why Green?!? It's Valentine's Day!" Well, I just happen to have green and white balloons for a little someone's upcoming birthday party and I'm too lazy to go get different ones....

Besides, green's awesome, if you didn't already know.


All that matters is that my baby likes 'em, right? This face says it all.....I think...


The best part? I have printables for this one, too! In many colors! 

Happy Valentine's Day!


 Free Balloon Valentine Printables: Green, Blue, Purple, Yellow, Orange, & Red.

Sunday, May 15, 2011

The Infamous Cupcake Hat


Ah, the infamous cupcake hat. I'm told by Stacy that the ones I've made for her two daughters always get compliments (I've made five of these hats so far, I think). To my knowledge, the original site where I found this pattern (several years ago) is no longer up. I've reproduced the pattern below, and subsequently left out all the crap that didn't need to be in there.

It should be noted that the pattern below calls for a red pompom for the cherry. The original pompom I made for my niece fell apart (her doing, no doubt), so I replaced it with a knitted cherry of my own design. The cherry and strawberry design are proprietary (i.e. secret, and what makes my hats special), so alas, you'll just have to make due with a pompom. I also have a blueberry design, but haven't actaully put them on a hat yet (everyone always requests the other fruits).

SIZE 1-4 years.

MATERIALS

Acrylic yarn in the following colors:
Cup: 1 skein gold or tan, Worsted Weight
Frosting: 1 skein pink or cream or brown, Worsted Weight
Cherry: Scrap Red Yarn, preferrably Chunky Size
You'll need: US 7 (4.5 mm) Circular Needle (16") and set of DPNs, OR SIZE TO OBTAIN GAUGE; Large-eyed, blunt needle
Optional: Buttons, scrap yarn, beads, safety pins
GAUGE 16 sts and 22 rows = 4" in St st BE SURE TO CHECK YOUR GAUGE.

Special Stitch: (MN) MAKE NUBBLE - Pull loop through the next st as if to K, then place this look on the left needle next to the original st(2sts). Pull new loop through the second st as if to K, then place loop on the left needle next to the second st (3sts). Repeat twice¡(5sts). BO 4 kwise. The fifth stitch is now on the right needle.

DIRECTIONS
With Cup Color and circular needle, cast on 80 sts. Work in k2 p2 ribbing for 1 row, join in the round and continue k2 p2 for 2 inches. Switch to Frosting Color. K one row. Next row, *K1, MN. Repeat until you made one row of nubbles (40 times total). K until entire piece measures 5 1/2 inches.

Then start the decreases (switch to dpns when necessary): *K 6, k2tog. Repeat from * 9 more times. *K 5, k2tog. Repeat from * 9 more times. *K 4, k2tog. Repeat from * 9 more times. *K 3, k2tog. Repeat from * 9 more times. *K 2, k2tog. Repeat from * 9 more times. *K 1, k2tog. Repeat from * 9 more times. *K2tog. Repeat from * 9 more times. Continue to k2tog until 5 stitches remain. Break off yarn and thread the end through the remaining 5 stitches.

With the chunky red, make a pom pom, about 1 inch wide. Whatever looks best on your cupcake. (You should be able to find a simple pompom tutorial by Googling.)

**NOTE: If making this hat for a child 2 or under be sure to attach the beads, buttons, etc very secure. Otherwise, do not include them.


Mr. grumpy modelling a cupcake.

Wednesday, February 23, 2011

Knitting Needle Roll

I can finally post this since this was a gift for my sister and she got it yesterday.

I got the idea as I was browsing tutorials online. This is the one I followed at madebyloulabelle, though there are lots of different ones out there. They all follow the same basic concept.

Anyway, I thought this was the perfect thing to make my sister because if she's anything like me (and she is) she's got a million knitting needles sittin' around and nothing cool to put them in. Except for me, it's crochet hooks. Seriously, I've got, like, 30 or 40 of them. That's on my project list - a crochet hook roll for me!

So I saw this gorgeous fabric on Joann's website and fell in love. They have several Asian inspired prints that are lovely. However, after shipping it would have been $12 a yard or so. The cheapskate in me just couldn't do it!

Lucky for me that there are several Joann's within reasonable driving distance and one of them had this fabric on the shelf.

I had to be really careful with the dimensions here. Making a rectangle is not as easy as you would think. Me and straight lines don't get along. I have problems people!

Here's what the pockets look like on the inside (that blur on the right is my daughter flailing her hand - what can you do?):


I thought it turned out really well. Go me!

Perhaps Tammy can post a picture with actual needles in it since I had none to put in as an example....

Wednesday, December 15, 2010

Crocheted Wreath Ornaments

I believe I mentioned before that I was searching for an ornament pattern to crochet as Christmas gifts and after trying to come up with something on my own for about a week, I broke down and bought a book from JoAnn's. I'm a quitter like that.

Anyway, one thing about making Christmas ornaments that you have to worry about/deal with is starching your project so that it's stiff and hang-able.

What I do is take a plastic sandwich bag, spray some starch inside and put in the crocheted piece. Then you work in the starch so every part is wet, take it out and squeeze it between pieces of paper towel to remove excess starch.

For the next part, you'll need a surface that takes pins well. I used to have some cork boards that I used for this but they got lost in our many, many moves and so here I just used a piece of cardboard with plastic wrap taped over it (so the piece doesn't stick). Also, you can see that I drew lines on it to guide me but they didn't really help because the symmetry was a little weird (i.e. I had the lines in the wrong place!) - I hate wasted effort. And then I pinned the thing down in the proper shape - if you don't know what that looks like, here you go:


It'll only take a few hours to dry and then you can remove the pins.

And here's the final product (my apologies for the less than stellar pictures here - I am lazy, that's all I can say - Maybe Tammy can post a better picture of the finished product since she has one!):


I just used gold embroidery floss for the hanger and voila! A do-it-yourself Christmas present!

Thursday, December 9, 2010

'Tis the Season...


... For giving!

Been working on a few TOP SECRET Christmas projects lately, so that's why you haven't heard from me. Can't post about those yet, but I CAN talk about what to do when you don't have a project or two lined up ...

Do you ever find yourself with the desire to knit, but you have no one to knit for? Let's be honest, one can only make so many hats and cat sweaters for their own amusement before the cat's like, "Enough!". Ahem, you know what I mean.

I have a tendency to fidget and knitting helps keep my hands busy, so I've been participating in a monthly knitting group lately to get my knitting fix. We make knitted and crocheted hats, booties, and blankies for newborns (they are donated to one of the area hospitals, in this case, one that serves a high proportion of low income families). I've found this to be quite fulfilling. You get to make something cute, and your handiwork goes to keeping a fresh baby warm!

I'd been using a pattern from a book in recent months, but it required too much sewing in my opinion. I hate sewing together my work at the end. It slows things down too much! "Faster!", I said. So I found this cute little pattern for some quick and easy baby booties: Easy 2 Needle Baby Booties. Now, usually I detest garter stitch in my work, but these have a surprisingly pleasant shape when finished. And they are not a nightmare to sew, either. Keep in mind when you sew the back edge to make sure to pull the yarn tight at the heel. It should make a swirl-like pattern and be flat like the rest of the sole. Make sure and leave enough of a tail at the beginning AND end of your pattern so you have enough yarn to sew up the seems.

The pattern called for a crocheted chain for the bow, but I thought that would look like crap, so I did a twisted cord instead (you could also use a satin ribbon). For a twisted cord: measure how much yarn you'll need for a bow and multiple that by three or four times. Cut that length of yarn and fold it in half, tying the end. Affix the tied end to something solid and twist your yarn til it's tightly twisted (keep the yarn straight so it doesn't twist back on itself while your doing this). Then carefully fold the yarn in half (back on itself) and hold the ends together (one end will still be attathed to your solid object). It will want to twist around itself, so let it (it will only "want" to twist in one direction), then keep twisting in the same direction until it takes on what I like to call an 'old-fashioned candy'-like texture. Tie both ends of your cord and thread it through your booties! (I untie the tied end from the beginning and re-tie it to catch the new end, then trim the yarn ends to match.)

Thursday, November 18, 2010

Personalizing Gifts with Knitting

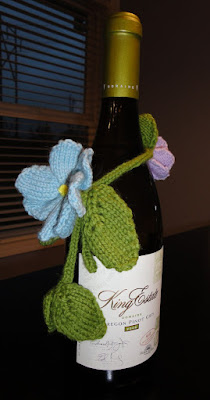
I wanted to give a couple of bottles of wine as gifts recently, but I figured that they would be too plain if I didn't snaz them up a little bit. It just so happens that I've had a book lying around that could help me with this: Nicky Epstein's Knitted Embellishments. (This book is only for knitters, if you're looking for some crocheted embellishments, might I recommend 100 Flowers to Knit and Crochet) My idea was pretty simple. Knit up some parts and then stick them all together somehow! (It would turn out fine, I kept telling myself.)

My "parts" ended up being six leaves (in three sizes), two flowers (in two sizes), and an i-cord (three stitches and approximately 12 inches long). From the book I used the pattern for a large leaf and a medium leaf. (It should be noted that I used the same pattern to make the medium sized and small leaves, I merely decreased the needle size to make them smaller.) I also used the same pattern for both flowers, but decreased the needle size and the yarn weight to acheive the smaller flower (I ended up liking the blue flower better. Working with the super thin purple yarn was a pain in the a**). After making the flowers and leaves I pressed them with an iron to keep the corners from curling.

I learned something when putting this together. When you're hanging something, make sure the heaviest part of your design is at the bottom. I know this seems obvious, but on my first attempt, I put the flowers to either side of the the knot on the i-cord, and it just didn't look right. It pulled the knot up so that it wasn't drooping. I did not like that. The finished product is on the left. Not too bad for a first attempt at anything like this. Next time I think I might try making a bunching of grapes or some such.