Thursday, December 30, 2010

Little dresses Part 2

I hope everyone had an enjoyable Christmas. I'm currently in Utah enjoying (not really) the fresh snow fall.

I'm finally getting around to posting about the second dress I made - for my oldest daughter. I have to say that I've never been more excited to put the sewing machine away than I was when I finished this dress.

McCall's Pattern #5742

I chose the patterns I chose because I thought from my very inexperienced perspective that the two were similar....but the only similarity I found is that they're both dresses.

Square neck versus round neck. Petticoat versus no petticoat. Ruffled hem band versus straight hem band. This second one is more of a spanish style versus, I don't know, an American style. There were a lot of ruffles on this one...

I thought the sleeves were a bit easier to do, though. It took me less time but I think this one was harder. It did help that I kind of knew what I was doing on this second go around.

I left off some of the details that the pattern called for because I didn't want them to look too different - and I didn't want to do any more hand sewing. Yes, I'm lazy. I admit it.

Something I didn't like is that the bodice turned out of bit wide. On the next dress I make I'm going to make sure the bodice fits a bit better.


All in all, I thought this was a respectable second effort.


(Jazz Hands)

Stay tuned for posts in late January. I've got some fun projects lined up for when I return from my trip to the Homeland (Oregon).

Friday, December 17, 2010

Crocheted Ornaments (continued)

As requested, finished ornaments by Stacy (on my tiny fake Christmas tree):


Wednesday, December 15, 2010

Crocheted Wreath Ornaments

I believe I mentioned before that I was searching for an ornament pattern to crochet as Christmas gifts and after trying to come up with something on my own for about a week, I broke down and bought a book from JoAnn's. I'm a quitter like that.

Anyway, one thing about making Christmas ornaments that you have to worry about/deal with is starching your project so that it's stiff and hang-able.

What I do is take a plastic sandwich bag, spray some starch inside and put in the crocheted piece. Then you work in the starch so every part is wet, take it out and squeeze it between pieces of paper towel to remove excess starch.

For the next part, you'll need a surface that takes pins well. I used to have some cork boards that I used for this but they got lost in our many, many moves and so here I just used a piece of cardboard with plastic wrap taped over it (so the piece doesn't stick). Also, you can see that I drew lines on it to guide me but they didn't really help because the symmetry was a little weird (i.e. I had the lines in the wrong place!) - I hate wasted effort. And then I pinned the thing down in the proper shape - if you don't know what that looks like, here you go:


It'll only take a few hours to dry and then you can remove the pins.

And here's the final product (my apologies for the less than stellar pictures here - I am lazy, that's all I can say - Maybe Tammy can post a better picture of the finished product since she has one!):


I just used gold embroidery floss for the hanger and voila! A do-it-yourself Christmas present!

Thursday, December 9, 2010

'Tis the Season...


... For giving!

Been working on a few TOP SECRET Christmas projects lately, so that's why you haven't heard from me. Can't post about those yet, but I CAN talk about what to do when you don't have a project or two lined up ...

Do you ever find yourself with the desire to knit, but you have no one to knit for? Let's be honest, one can only make so many hats and cat sweaters for their own amusement before the cat's like, "Enough!". Ahem, you know what I mean.

I have a tendency to fidget and knitting helps keep my hands busy, so I've been participating in a monthly knitting group lately to get my knitting fix. We make knitted and crocheted hats, booties, and blankies for newborns (they are donated to one of the area hospitals, in this case, one that serves a high proportion of low income families). I've found this to be quite fulfilling. You get to make something cute, and your handiwork goes to keeping a fresh baby warm!

I'd been using a pattern from a book in recent months, but it required too much sewing in my opinion. I hate sewing together my work at the end. It slows things down too much! "Faster!", I said. So I found this cute little pattern for some quick and easy baby booties: Easy 2 Needle Baby Booties. Now, usually I detest garter stitch in my work, but these have a surprisingly pleasant shape when finished. And they are not a nightmare to sew, either. Keep in mind when you sew the back edge to make sure to pull the yarn tight at the heel. It should make a swirl-like pattern and be flat like the rest of the sole. Make sure and leave enough of a tail at the beginning AND end of your pattern so you have enough yarn to sew up the seems.

The pattern called for a crocheted chain for the bow, but I thought that would look like crap, so I did a twisted cord instead (you could also use a satin ribbon). For a twisted cord: measure how much yarn you'll need for a bow and multiple that by three or four times. Cut that length of yarn and fold it in half, tying the end. Affix the tied end to something solid and twist your yarn til it's tightly twisted (keep the yarn straight so it doesn't twist back on itself while your doing this). Then carefully fold the yarn in half (back on itself) and hold the ends together (one end will still be attathed to your solid object). It will want to twist around itself, so let it (it will only "want" to twist in one direction), then keep twisting in the same direction until it takes on what I like to call an 'old-fashioned candy'-like texture. Tie both ends of your cord and thread it through your booties! (I untie the tied end from the beginning and re-tie it to catch the new end, then trim the yarn ends to match.)

Sunday, December 5, 2010

Stacy's Towering Chocolate Cake

Because I just made a huge post over on facebook about this - here it is for all future generations - my method for the hugely popular Towering Chocolate Cake.

(Recipes for Chocolate Butter Cream, Chocolate Mousse, & Chocolate Ganache below)

The cake is just a Betty Crocker box cake - Triple Chocolate Fudge. They make such awesome cakes, why mess around trying to find the perfect 'from scratch' recipe? My only caution is to make sure you don't over-bake because a dry cake is not a good cake. If you have a chronic dry cake problem, try adding 1/4 cup sour cream to the batter.

I use two boxes (mixing them up together) and split them into three 9 inch cake pans. I leveled them off using a leveler - a large bread knife also works well though it may be hard to get a truly level cake.

I usually use two fillings - a fruit and a mousse. I've used fresh strawberries before and those tasted AWESOME, but canned pie filling also works great if it's the dead of winter.

To stack, put a glob of frosting on your cake board and put the bottom cake on top of it. Put a thick ring of frosting around the edge of the cake.

** Important note - make sure your fillings aren't any thicker than your cake layers and that your fillings aren't thicker than your outside ring of frosting because they will leek out if there is too much in there....just sayin'.**

Put the fruit filling inside your frosting ring. Then put on your mousse. Place second cake layer on and repeat the same process.

For the last layer, I put the cake on bottom side up so you get a clean edge.

Put a thin layer of chocolate frosting over the whole thing. This is your crumb coat so it doesn't have to be pretty. Put it in the fridge until the crumb coat hardens. Put on another thicker coat of frosting, makin' it look smooth and pretty.

Pour your ganache over the top of the cake.

Pipe some frosting decorations, add some fruit and your done!

~~~~~~~~~~~~~~~~~~~~~~~~~~~~~~~~~~~~~~~~~~

Chocolate Ganache

1/2 Cup chocolate chips
1/2 Cup heavy whipping cream

Heat it up little by little (30 seconds at a time). Then whisk the cream and chocolate together. If it starts to harden you can just reheat it.

~~~~~~~~~~~~~~~~~~~~~~~~~~~~~~~~~~~~~~~~~~

Chocolate Butter Cream (I had to make two batches - this cake is definitely not low fat)

1 cup butter
1 cup melted (& cooled) chocolate - semi-sweet or dark - You can use chocolate chips or a chunk of chocolate.
2-3 tablespoons heavy whipping cream (or milk)
1 teaspoon vanilla
2 1/2 cups powdered sugar

Whip the butter until it's smooth. Add the chocolate. Add the sugar. Add the vanilla & cream and whip until light and fluffy.

~~~~~~~~~~~~~~~~~~~~~~~~~~~~~~~~~~~~~~~~~~

Chocolate Mousse:

1/2 Cup bittersweet or semisweet chocolate chips
2 tablespoons unsalted butter, cut in small pieces
2 large eggs, separated
1/8 teaspoon cream of tartar
3 tablespoons sugar, divided
1/2 teaspoon vanilla extract
1/2 cup heavy whipping cream

Melt the chocolate and butter in the microwave 30 seconds at a time - should only take a minute at the most. Set aside to cool for a few minutes. Then whisk in the two egg yolks. Refrigerate.

In the bowl of your electric mixer, whip the two egg whites with the cream of tartar until foamy. Gradually add two tablespoons of sugar and continue to beat until stiff peaks form, yet the whites are still glossy and not dry. Set aside.

In another bowl, whip the heavy cream, remaining one tablespoon sugar, and vanilla extract until soft peaks form.

Remove the chocolate mixture from the refrigerator, and stir a couple of spoonfuls of the beaten egg whites into the chocolate mixture to lighten it, and then fold the remaining whites into the chocolate mixture, gently but thoroughly. Fold in the whipped cream.

Voila!

Saturday, December 4, 2010

Little dresses

Lest you think I have dropped off the face of the planet, I'm here to say 'tis not so!

I've just retreated into stressed-out-about-Christmas-hermit-land from which I am emerging because I am DONE - yeah! Shopping done, packages mailed. I should get a freakin' gold medal!

Anyway, during my hermit-dom, I have, in fact, been making things!

Like this fancy little number:

McCall's Pattern #M5791

I saw this blue flocked taffeta at Joann's while I was scouring the Pennsylvanian countryside for Christmas ornaments and fell in LOVE. But I didn't get it just then. Seriously though, I couldn't stop thinking about. So I made a special trip to get it - the two closer stores didn't have it. It was a solid thirty minute drive both ways with two very bored children in the back of the car. I think I'm developing an unhealthy attachment to fabrics...

Anyway, it's for Ms. Pants, who is now the cutest nine-month old EVER. But I messed up on this dress SO MANY TIMES. I think some of my mess ups were just mind fatigue like 'I have to redo this AGAIN!? Why am I still working on this?! Someone PLEASE just finish this for me!'

This was the first time I had worked with a pattern so I learned a lot from trial and error. Zippers are not as hard as they may seem. Making an even gather is not so easy...Making a cloth bow is also not so easy. I really like how it turned out as long as I don't think about the visible errors.

Pants seems to like it, though:


Now to make a matching one for Ms. Madeline.

Yay....?

Monday, November 22, 2010

Slippers


I said I was going to be making these AGES ago - well, maybe not ages, but it seemed like awhile - and I finally got around to it. They match the capelet I made for my niece a few weeks ago.

I was dreading the shoes because I found out that my little niece's feet are significantly smaller than the feet I used to make the pattern - even though Madeline is only 3 1/2 months older, her feet are ginormous (by the way, did you know that 'ginormous' is in the spell checker - who knew?). Anyway, I didn't even want to think about how I was going to re-size this pattern. I thought it was going to be a hassle. But when I finally sat down to do it (scanning it and resizing the image in Photoshop, using wiki's page about shoes sizes as a reference), it took me like ten minutes!

A couple things I did differently than the last pair was that I didn't stuff the soles and therefore didn't need to sew the middles to keep the stuffin' in place. I saved myself some work there. Also, I used corduroy which will undoubtedly hold up better than the satin-y stuff I used for the butterfly shoes. Also, I sewed the soles so that I could turn them and get a clean seam when I sewed the top of the shoes to the bottoms.

Overall I think they turned out well. I can't wait to see if they fit.

Merry Christmas to you Ms. Banana.

Thursday, November 18, 2010

Personalizing Gifts with Knitting

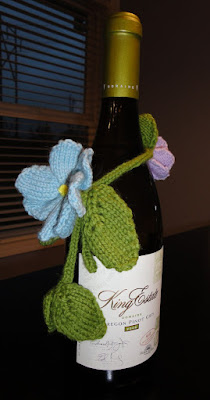
I wanted to give a couple of bottles of wine as gifts recently, but I figured that they would be too plain if I didn't snaz them up a little bit. It just so happens that I've had a book lying around that could help me with this: Nicky Epstein's Knitted Embellishments. (This book is only for knitters, if you're looking for some crocheted embellishments, might I recommend 100 Flowers to Knit and Crochet) My idea was pretty simple. Knit up some parts and then stick them all together somehow! (It would turn out fine, I kept telling myself.)

My "parts" ended up being six leaves (in three sizes), two flowers (in two sizes), and an i-cord (three stitches and approximately 12 inches long). From the book I used the pattern for a large leaf and a medium leaf. (It should be noted that I used the same pattern to make the medium sized and small leaves, I merely decreased the needle size to make them smaller.) I also used the same pattern for both flowers, but decreased the needle size and the yarn weight to acheive the smaller flower (I ended up liking the blue flower better. Working with the super thin purple yarn was a pain in the a**). After making the flowers and leaves I pressed them with an iron to keep the corners from curling.

I learned something when putting this together. When you're hanging something, make sure the heaviest part of your design is at the bottom. I know this seems obvious, but on my first attempt, I put the flowers to either side of the the knot on the i-cord, and it just didn't look right. It pulled the knot up so that it wasn't drooping. I did not like that. The finished product is on the left. Not too bad for a first attempt at anything like this. Next time I think I might try making a bunching of grapes or some such.

Wednesday, November 17, 2010

Painting Christmas Ornaments

Yes, yes, I know, it's been so long! I've been knee deep in my many, many craft projects! Now that Christmas is upon us there's so much to do and so little time!

But, here's something I've been working on for the last couple of months - I organized a Relief Society activity where we painted Christmas ornaments.


These are the examples I made - I got them at Joann's. Three of them got broken in the course of doing the activity so I had to paint new ones (the tree, the snowman and the round ornament). I used the opportunity to fix what I didn't like about the ones I'd already done.

I've still got lots to paint though - ornaments I picked up last year on clearance and smaller ornaments I've gotten this year - perhaps I'll get around to those once I've finished up all my Christmas projects!

Lest you think that you're 'not a painter' let me just say that practice makes perfect. We used to paint ceramics all the time when I was a kid and the results weren't always very good but you'll get better - practice! That's all it takes!

Thursday, November 4, 2010

Capelets

I found a pattern for capelets over at Prudent Baby. They have lots of fun, free patterns/tutorials.

Today I made my second capelet.

This was the first:


I made it for one of Madeline's friends for her birthday. I thought it turned out well, but being a slight perfectionist, there were a couple things that I didn't like about it. First was that the collar and cape were supposed to be contrasting and that was 100% my fault - I just sewed the thing together wrong. Second was that the straps were attached on the outside - which is what the tutorial said to do....maybe she thought it was more whimsical? I don't know, but I thought I could do better.

Here is my second attempt~~~~~~~~~~~~~~>

I whipped this puppy up today. I would have had my 'model' wear this except she had an accident and is hideous. Hideous!

I was going to do two normal cotton fabrics again and then I saw this corduroy and I couldn't help fanning my hands in excitement at how awesomely cute this was going to be. Okay, so there wasn't any hand fanning but this is stinkin' cute!


And below is a picture of the new and improved strap attachment! I thought it would make it harder to turn if I sewed them in, but it wasn't harder at all AND I LOVE how they look. So clean. So neat!


I'm going to be making some matching shoes to go with this (it's a Christmas present!) so stayed tuned!

Monday, November 1, 2010

Vegetable Minestrone Soup (a.k.a. the BEST SOUP EVER)

I now present to you, the recipe for the BEST SOUP EVER.

The original version of this recipe came from a cookbook at my mother-in-law's house. It was great, but didn't suit the disparate likes and dislikes of my little family, so I made some modifications. You could substitute all sorts of vegetables into this soup, like squash or potatoes or cauliflower - whatever floats your boat. Or you could add beans (which I took out because the Husband doesn't like them).

I can't tell you how much I love this soup, so enjoy.

Vegetable Minestrone with Pasta

2 tbsp olive oil
1 yellow onion or 1/2 of a sweet onion, finely chopped
1 clove garlic, finely chopped
1 large can (49.5 oz) chicken stock
1 can (15 oz) whole tomatoes with their juice, food processed to little bits
1 large carrot, coarsely chopped
1 zucchini, coarsely chopped
½ tbsp dried basil
½ tbsp dried oregano
½ tbsp sugar
1 bay leaf
3/4 cup dried pasta (Mafalda is my favorite - they look like mini lasagnas)
a handful of alphabet pasta or stars
1 cup frozen tortellini or ravioli
Salt and freshly ground pepper
1 tbsp dried parsley
2/3 (3 oz/90g) cup freshly grated Parmesan cheese

Heat the oil in a large pot over medium heat. Add the onion and garlic and sauté until translucent, 2-3 minutes.

Add the stock, processed tomatoes (you can process them OR just use the spoon to break them up - personally, I think the spoon does a lousy job and I don't like the texture of tomatoes so....into the food processor they go), carrot, zucchini, basil, oregano, parsley, sugar and bay leaf.

Cover partially and simmer until the vegetables are tender-crisp, about 20 minutes.

Add the dried pasta and frozen tortellini or ravioli and cook, uncovered, until al dente, 8-10 minutes more.

Season to taste with salt and pepper. Ladle into bowls. Garnish with Parmesan.

(p.s. I totally forgot to take a picture of the finished product, but it sure is yummy)

Sunday, October 31, 2010

Halloween Sweets - Skewered Eyeballs

This treat is pretty straightforward. I found the recipe on the internets, however, it didn't go as expected. I had to improvise and I think my way actually turned out better.

First you take about 12-18 plain donut holes and stick them onto forks (I used plastic halloween colored ones). Make sure you don't compromise the structural integrity of the donut hole when skewering (you don't want it to break apart in the next step). I put them in mugs to keep them from touching each other or a flat surface.

Then you take each forked donut and frost it lightly with white frosting. When they are all frosted, put them in the freezer so that the frosting hardens (about an hour or so).

When the frosting has set, melt some colored candy melts in a plastic resealable bag to make the irises (**note: this is not what I did, but I wish I had). Make sure all the air is out of the bag and then cut off a corner so you can squeeze out the candy. Make a round shape on each frosted donut. Have chocolate chip pupils ready to insert into the colored candy while it's still malleable. Put the donuts back into the freezer to set again if necessary.

The last step is to add the gore. Use red decorator frosting to add some bloody-ness to your eyeballs, freeze or refrigerate until they are served, and viola!

**The original recipe called for the use of white chocolate. It should be noted that I hate white chocolate, so when it didn't work out, I was not heartbroken. Anyways, I tried to melt the white chocolate in a saucepan and it immediately started to burn, so then I put it in a glass measuring cup to melt in the microwave. This worked and the chocolate was smooth and melty. I tried dunking the donut and the chocolate would not stick to it! After a couple tries the donut fell apart and the chocolate started to harden. So I put it back in the microwave and instead of melting it burned again. I tried melting it in a non-stick pan after that, but it was ruined and I had to throw it out. I cast around for a substitute and found some frosting, which quite frankly, is more appetizing anyway. I made my irises out of white chocolate that I had melted in small glass cups and then mixed in food coloring. This is not advised. The chocolate immediately started to seize up when the color was added. I was able to melt it in bags after that, but it was a total PITA to get it to stick to the donuts (I used a clean finger to shape the iris into a circle... I did a better job of this with the green). And it should be noted that I didn't add the pupils soon enough to the blue eyes and so I had to remelt the center of the blue white chocolate with the tip of a hot butterknife (I was cooking dinner at the time, so I just held the knife to the bottom of the cook pot I was using for about 10 seconds to heat it up).

Friday, October 29, 2010

The search for the perfect Christmas ornament

Two years ago I started a tradition of crocheting Christmas ornaments for my family.

It's inexpensive. It's fun! Homemade gifts are the best!

I made snow flakes two years ago.

This is what I did last year - they're mini Christmas potholders:


I found the pattern at Crochet Soiree. They have lots of free patterns to download. The original potholder pattern called for worsted weight yarn - but I love to miniaturize! So I used thread instead, and voila!

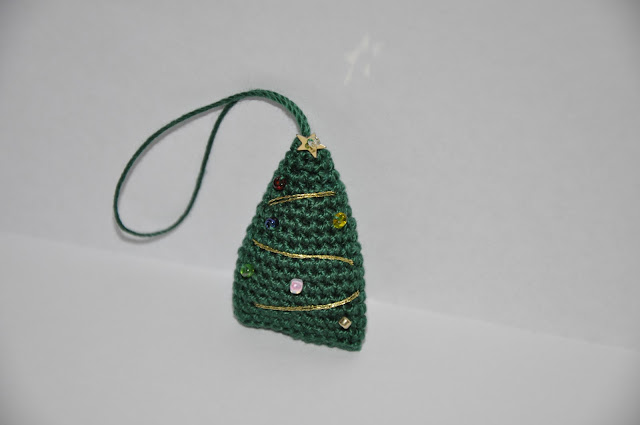
This year I wanted to do a little Christmas tree. I tried to come up with something of my own, three tries later I'm getting close to something that may be acceptable...this is the first time I've ever tried to make my own pattern so I suppose I should cut myself some slack.

But in the meantime, The Kansas Hooker had this cute pattern. Again, instead of using yarn, I used thread and it came out quite quaint and precious.


However, I don't think it's quite what I'm looking for. I think the shape is too simple. And it's very small - only about an inch and a quarter high.

Oh well, the search continues!

Tuesday, October 26, 2010

Drawstring Purse


Here's a quick and easy project to do if you have a little girl (or if your little boy likes this sort of thing.....).


Using this tutorial over at 7 Layer Studio - I made Madeline a fun little bag - for candy on Halloween - but I'm sure she'll use it for other things too!


Saturday, October 23, 2010

Knitting Cat Sweaters

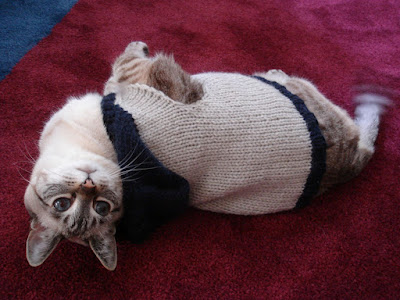
"Why would you knit your cat a sweater?" you ask. Yes, they're perfectly capable of staying warm on their own. However, it is hilarious. I think I laughed for several minutes straight the first time I put a sweater on my cat. It happened to be the one on the left. This was also my first attempt at making any kind of sweater, and incidentally, it was good practice for making "real" sweaters (you know, for babies and stuff). A couple of things about my obese diabetic cat Nalla: She is very tolerant (not all cats will allow you to put a sweater on them). She is an odd shape (i.e. fat, but in a weird way... she's kind of gourd shaped). She also has excess skin that hangs down around her belly and arms. This ensures that no sweater pattern will ever fit her as written. It's kind of hard to see in this picture, but there's an argyle pattern on the front. This sweater turned out really nice considering I used crap yarn (i.e. Red Heart) and I ignored the gauge on purpose to make the sweater bigger than written (I ignore gauge a lot, and it usually works out all right... but I'll need to do a future post on "when ignoring gauge goes horribly, hilariously wrong").

Anyways, when I put this on her she looked like a sausage and refused to move around. It was too short and the arms were too restrictive for our little fatty. We ended up sending this sweater to a friend of ours with small dogs. Sadly, this pattern is no longer available on the internets (which is where I've found all of my cat sweater patterns). I'll have to type it up and post it on here sometime. Always print out your patterns, since you may not be able to find them again!

My favorite sweater that I've made so far is the Mandarin Cat Sweater. I even tried to adjust this one as indicated in the pattern and it still wasn't quite right. Oh, how kitty wishes she were as elegant as the siamese cat in the orginal post! I should have made this one a few inches longer in the torso and a few inches shorter in the arms. Because she's got fat hanging down around her arms, this makes her legs seem a lot shorter. She was basically tripping over the arms. I also didn't like the yarn I used for the black trim. I was worsted weight and was a little too stiff and heavy in comparison to the cream colored yarn.

The last sweater I'll talk about is the Cat Hoodie, which on any other cat (or dog) would be really cute. This is the only sweater that I've made that I can accurately say fits her. I believe I increased needle sizes to make it bigger. I also made it longer in the torso section. I would have liked to include the sleeves, but once again, fatty arms doesn't tolerate sleeves. If I were making this again I would have lengthened the hoodie part to make it a little more functional.

I decreased the needle size to make the same sweater for my parents' dog last Christmas. The hood on that one
is basically decorative. It's way too small (and dogs kind of have long necks it seems). I don't think I could have made it functional without it looking funny. I also shortened the sleeves and it turned out super cute.

Pink Butterfly Halloween Costume, Part 3

PINK 'BUTTERFLY' SHOES:


There was no way I was going to let Madeline step out in plain ol' BORING shoes, so I decided to try making my own. Why not, right?

Well, I turned to my trusty old friend, the internets, for some guidance and there was.....pretty much none to be found. Why is everyone so hush hush about making shoes? Free patterns? Yeah, right.

This made me a little annoyed, because, ya know, I'm cheap. And lazy. And I don't know nothin' 'bout makin' no patterns.

But.....I decided to give it a shot anyway.

So I traced my daughter's feet on a sheet of paper and then prettied them up a bit so they actually looked like, ya know, FEET (if you've ever tried tracing a three year old's anything - hands, feet, whatever - you know it's no easy task). I knew I wanted them to be pointy so I took the basic foot outline and made it pointy from the proximal phalanges (i.e. the widest part of the foot) forward. Then I added a 1/4" seam allowance to the whole thing. By the way, I just made one pattern (for the right side) and just flipped it over for the left foot (for the sole and top both).

My method for the shoe top was to fake it 'til I made it. My first attempt wasn't successful - it wasn't a complete failure, but it wasn't completely right either. However, my second attempt was perfect! How did I know it was going to work? Why, I made a paper shoe of course!


I thought the paper shoe turned out pretty snazzy!

Anyway, once I had my pattern worked out, I had to cut out my fabric. I decided to go with satin, pink broadcloth for the liner and this shiny mesh-like fabric - I *think* it might be tulle but I'm not sure (all three of these came from my late Grandmother's vast fabric hoard so forgive my ignorance).


I cut out two top pieces from each fabric. For the soles, I cut four of satin and four of broadcloth (two right and two left) because I was going to do a sole and an insole.

To make the sole, I sandwiched some stuffing between a satin piece (which is the bottom of the shoe) and a broadcloth piece, sewed a straight stitch around the whole thing, sewed a zig-zag stitch around the outside edge, and then did some patterned stitches in the middle to keep the stuffing in place and provide some (minimal) traction.

For the insole, I put a satin and broadcloth piece right sides together and sewed a straight stitch around the edge leaving a hole to turn it inside out. I turned it, stuffed it and did another straight stitch around the edge and some patterned stitches in the middle.

For the top, I layered the tulle with the satin and sewed the heel right sides together. Then I sewed the broadcloth liner's heel. I pinned the top and liner together around the foot hole (right sides together) and sewed around. I cut the sharp corners so they would lay flat when turned and turned the whole thing so it was right side out.

I pinned the top to the sole, right sides together, and sewed around. This is what it looked like after all that:


Then you just have to turn the whole thing right side out and insert the insole. I tried to sew the insole in but I didn't like the way it was turning out so right now it's going commando. I suppose velcro would probably work, though I haven't tried it.


Easy peasy, right?

Well, maybe not. But I had so much fun with these! My experiments often don't turn out well so I was very pleased with my results here and it's given me confidence to try making patterns for other things as well.


(My happy little butterfly)

Thursday, October 21, 2010

Pink Butterfly Halloween Costume, Part 2

Welcome to part 2 of what is turning out to be a very long post about my lovely child's Halloween costume. You'll have to wait until part 3 for the shoes, I'm afraid.

PINK TUTU:


I'd never made a sewn tutu before. The purple one I made was tied, so sewing one was new territory. It turned out awesome-looking, however, I wouldn't make one the way I did again, since there is absolutely no stretch in the waste whatsoever. It is strictly a 4T size and will always be a 4T size. Oh well.

I cut 20 pieces of light pink tulle that were 20 or so inches by 6 inches-ish. I separated them into 10 piles, folded them in half lengthwise and then folded them in half width-wise. I then cut 40 pieces of magenta tulle that were 10 in x 6 in. I put four of these together and folded them lengthwise, putting one group of four in each of the ten piles.

I cut a piece of elastic that fit my daughter's waist (22" if you were wondering) and sewed the ends together to make it a circle.

Then I draped the light pink tulle through the elastic circle (at the fold I mentioned earlier) and evened up the ends, and just draped an inch or so of the magenta tulle over the top of the waistband and sewed.


Now, here's where I went wrong. Instead of sewing each bundle of tulle separately, I overlapped them, which LOOKS really cool - it's like a tulle pleat!...but renders the elastic useless.

Anyway, after sewing all ten bunches to the elastic. I cut some sparkly magenta tulle into 6 or 8 10 in x 6 in pieces. I folded the the long sides towards the middle of the fabric and then sewed it onto the waistband, folded side down, draping the tulle over the top of the waistband like I did with the other tulle. I sewed the rest of the shiny tulle pieces the same way, leaving little spaces between each on the waistband. And then I declared myself done!


Stay tuned for part 3, where I'll talk about the shoes - this time I mean it!

Wednesday, October 20, 2010

Pink Butterfly Halloween Costume, Part 1

So, when I asked my first-born (age 3) what she wanted to be for Halloween this year she said a purple butterfly - which would have been PERFECT because I had already made a purple tutu a year and a half ago and she had purple wings that she got last Christmas - though they were a little sad because they were made from tights material and children just don't come more destructive than mine (yes, that means you too, Ms. Pants).

Unfortunately, she changed her mind the next time I asked and insisted she wanted to be PINK instead. Oh Goody.

So, here's what I did:

Pink leotard - purchased on Walmart.com. It was a little big for my 4T little girl, but then I washed it and it was perfect.

PINK BUTTERFLY WINGS:


I took her old, sad purple wings and cut off all the purple tight material and felt. I was left with the wire frame, which was white (thank goodness - I didn't want to have to paint them!). I suppose I could have just bought some pink tights and pulled those over the frame, but I'm a masochist, so instead I bought some pink iridescent tissue lame (and a special needle to sew it AND interfacing). I traced a pattern using the wire frame onto parchment paper and then cut four pieces of tissue lame and two pieces of interfacing using the pattern. Turns out I could have done it without the interfacing but *shrug*. I sewed the pieces together with the interfacing on top, leaving a (big) hole to get the frame through. I removed the interfacing and then turned the wing inside out and ironed it, then slipped it onto the frame. Repeat process for the other side.

THEN - because I thought they were too boring - I sewed some pieces of tulle onto the wings to give them movement.

I didn't want to use just plain old white elastic for the straps so I sewed some tissue lame tubes and put the elastic through them. I attached them to the frame by sewing them to a piece of fabric that I had draped around the center of the two wings and sewed in place.

To finish everything off I sewed on some tulle to cover anything hideous. Tulle covers a multitude of sins.

Voila:


BUTTERFLY ANTENNAE:


I bought the pink sparkly headband at Joann's for $1.00. The wire I had on hand from another project I did last Christmas. I found it in the jewelry making isle at Michael's (I think).

I just looped the wire around the headband and twisted it around itself, tightening it with some pliers. Then I tied leftover tulle pieces around the wound part of the wire. Easy peasy antennae. It took me all of ten minutes.

Stay tuned for part 2, where I'll discuss how not to make a tutu and making shoes!

Monday, October 18, 2010

Welcome to Dual Perspicacity

Hello and welcome to Dual Perspicacity.

I've been considering starting a blog about crafts for awhile now since that's mainly what I've been focusing on in my free time lately (that and re-reading The Wheel Of Time - I don't think I'm going to finish five more books before Towers of Midnight comes out on November 2nd.....). And Christmas is coming up and who doesn't like Christmas crafts - not to mention making gifts. I think homemade gifts are the best!

And look forward to an upcoming post about my first-born's Halloween costume (I made shoes!). Also, I might talk about food sometimes. I love food. Love to make it, love to eat it.

Also, somehow I got my sister, who I have long considered to be more creative, talented and generally more awesome than I am, to do this blog with me! She's the one responsible for the cupcake hat that everyone thinks is the cutest thing ever.

We hope you enjoy and come again!