Monday, November 22, 2010
Slippers
I said I was going to be making these AGES ago - well, maybe not ages, but it seemed like awhile - and I finally got around to it. They match the capelet I made for my niece a few weeks ago.
I was dreading the shoes because I found out that my little niece's feet are significantly smaller than the feet I used to make the pattern - even though Madeline is only 3 1/2 months older, her feet are ginormous (by the way, did you know that 'ginormous' is in the spell checker - who knew?). Anyway, I didn't even want to think about how I was going to re-size this pattern. I thought it was going to be a hassle. But when I finally sat down to do it (scanning it and resizing the image in Photoshop, using wiki's page about shoes sizes as a reference), it took me like ten minutes!
A couple things I did differently than the last pair was that I didn't stuff the soles and therefore didn't need to sew the middles to keep the stuffin' in place. I saved myself some work there. Also, I used corduroy which will undoubtedly hold up better than the satin-y stuff I used for the butterfly shoes. Also, I sewed the soles so that I could turn them and get a clean seam when I sewed the top of the shoes to the bottoms.
Overall I think they turned out well. I can't wait to see if they fit.
Merry Christmas to you Ms. Banana.
Thursday, November 18, 2010
Personalizing Gifts with Knitting
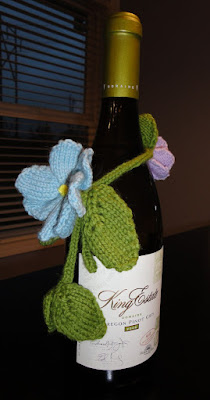
I wanted to give a couple of bottles of wine as gifts recently, but I figured that they would be too plain if I didn't snaz them up a little bit. It just so happens that I've had a book lying around that could help me with this: Nicky Epstein's Knitted Embellishments. (This book is only for knitters, if you're looking for some crocheted embellishments, might I recommend 100 Flowers to Knit and Crochet) My idea was pretty simple. Knit up some parts and then stick them all together somehow! (It would turn out fine, I kept telling myself.)
My "parts" ended up being six leaves (in three sizes), two flowers (in two sizes), and an i-cord (three stitches and approximately 12 inches long). From the book I used the pattern for a large leaf and a medium leaf. (It should be noted that I used the same pattern to make the medium sized and small leaves, I merely decreased the needle size to make them smaller.) I also used the same pattern for both flowers, but decreased the needle size and the yarn weight to acheive the smaller flower (I ended up liking the blue flower better. Working with the super thin purple yarn was a pain in the a**). After making the flowers and leaves I pressed them with an iron to keep the corners from curling.
I learned something when putting this together. When you're hanging something, make sure the heaviest part of your design is at the bottom. I know this seems obvious, but on my first attempt, I put the flowers to either side of the the knot on the i-cord, and it just didn't look right. It pulled the knot up so that it wasn't drooping. I did not like that. The finished product is on the left. Not too bad for a first attempt at anything like this. Next time I think I might try making a bunching of grapes or some such.
Wednesday, November 17, 2010
Painting Christmas Ornaments
Yes, yes, I know, it's been so long! I've been knee deep in my many, many craft projects! Now that Christmas is upon us there's so much to do and so little time!
But, here's something I've been working on for the last couple of months - I organized a Relief Society activity where we painted Christmas ornaments.
These are the examples I made - I got them at Joann's. Three of them got broken in the course of doing the activity so I had to paint new ones (the tree, the snowman and the round ornament). I used the opportunity to fix what I didn't like about the ones I'd already done.
I've still got lots to paint though - ornaments I picked up last year on clearance and smaller ornaments I've gotten this year - perhaps I'll get around to those once I've finished up all my Christmas projects!
Lest you think that you're 'not a painter' let me just say that practice makes perfect. We used to paint ceramics all the time when I was a kid and the results weren't always very good but you'll get better - practice! That's all it takes!
Thursday, November 4, 2010
Capelets
I found a pattern for capelets over at Prudent Baby. They have lots of fun, free patterns/tutorials.
Today I made my second capelet.
This was the first:
I made it for one of Madeline's friends for her birthday. I thought it turned out well, but being a slight perfectionist, there were a couple things that I didn't like about it. First was that the collar and cape were supposed to be contrasting and that was 100% my fault - I just sewed the thing together wrong. Second was that the straps were attached on the outside - which is what the tutorial said to do....maybe she thought it was more whimsical? I don't know, but I thought I could do better.
Here is my second attempt~~~~~~~~~~~~~~>
I whipped this puppy up today. I would have had my 'model' wear this except she had an accident and is hideous. Hideous!
I was going to do two normal cotton fabrics again and then I saw this corduroy and I couldn't help fanning my hands in excitement at how awesomely cute this was going to be. Okay, so there wasn't any hand fanning but this is stinkin' cute!
And below is a picture of the new and improved strap attachment! I thought it would make it harder to turn if I sewed them in, but it wasn't harder at all AND I LOVE how they look. So clean. So neat!
I'm going to be making some matching shoes to go with this (it's a Christmas present!) so stayed tuned!
Today I made my second capelet.
This was the first:
Here is my second attempt~~~~~~~~~~~~~~>
I whipped this puppy up today. I would have had my 'model' wear this except she had an accident and is hideous. Hideous!
I was going to do two normal cotton fabrics again and then I saw this corduroy and I couldn't help fanning my hands in excitement at how awesomely cute this was going to be. Okay, so there wasn't any hand fanning but this is stinkin' cute!
And below is a picture of the new and improved strap attachment! I thought it would make it harder to turn if I sewed them in, but it wasn't harder at all AND I LOVE how they look. So clean. So neat!
Monday, November 1, 2010
Vegetable Minestrone Soup (a.k.a. the BEST SOUP EVER)
I now present to you, the recipe for the BEST SOUP EVER.
The original version of this recipe came from a cookbook at my mother-in-law's house. It was great, but didn't suit the disparate likes and dislikes of my little family, so I made some modifications. You could substitute all sorts of vegetables into this soup, like squash or potatoes or cauliflower - whatever floats your boat. Or you could add beans (which I took out because the Husband doesn't like them).
I can't tell you how much I love this soup, so enjoy.
Vegetable Minestrone with Pasta
2 tbsp olive oil
1 yellow onion or 1/2 of a sweet onion, finely chopped
1 clove garlic, finely chopped
1 large can (49.5 oz) chicken stock
1 can (15 oz) whole tomatoes with their juice, food processed to little bits
1 large carrot, coarsely chopped
1 zucchini, coarsely chopped
½ tbsp dried basil
½ tbsp dried oregano
½ tbsp sugar
1 bay leaf
3/4 cup dried pasta (Mafalda is my favorite - they look like mini lasagnas)
a handful of alphabet pasta or stars
1 cup frozen tortellini or ravioli
Salt and freshly ground pepper
1 tbsp dried parsley
2/3 (3 oz/90g) cup freshly grated Parmesan cheese
Heat the oil in a large pot over medium heat. Add the onion and garlic and sauté until translucent, 2-3 minutes.
Add the stock, processed tomatoes (you can process them OR just use the spoon to break them up - personally, I think the spoon does a lousy job and I don't like the texture of tomatoes so....into the food processor they go), carrot, zucchini, basil, oregano, parsley, sugar and bay leaf.
Cover partially and simmer until the vegetables are tender-crisp, about 20 minutes.
Add the dried pasta and frozen tortellini or ravioli and cook, uncovered, until al dente, 8-10 minutes more.
Season to taste with salt and pepper. Ladle into bowls. Garnish with Parmesan.
(p.s. I totally forgot to take a picture of the finished product, but it sure is yummy)
Subscribe to:
Posts (Atom)