Thursday, March 21, 2013

Halloween 2012 - Tinker Bell & Rapunzel


Still  working on stuff I did last year... Someday I will catch up. But I'm finally getting around to the Halloween costumes I made for the girls last year. 

Miss Tinker Bell herself.


I didn't plan as well this time, so instead of getting done a month early, I was literally hot gluing flowers to Madeline's wig the DAY OF Halloween. I'd only finished Madeline's dress the day before. My stress level was pretty high. In my defense, I was a little distracted with my infant son, but this year I'm determined to start and finish early again!


I used McCall's pattern number M4887 for the fairy dress and made my own pattern for the wings, using the method outlined in the pattern (I thought the wing pattern included was too round!). I also made some bloomers that go to the knee to wear underneath the dress, which you can sort of see in the second picture from the top - those weren't part of the pattern either. 


For Rapunzel, I used Simplicity pattern number 2065. I didn't bother making the yarn wig. I just bought a long blond wig from Amazon (and glued flowers into it, as I mentioned earlier). 


With the wig.


Did I mention this is an adult sized wig? And it STILL didn't quite fit. My child has the biggest head ever.


Trick or treating. 


fin.

Friday, February 15, 2013

Minnie Mouse Cake


This was my very first commissioned cake. I made it for my friend Becky's adorable little girl.

I was worried about the added pressure of making a cake for someone else (hello, perfectionist Stacy in overdrive) but it was no. big. deal.

I hope she likes it!


Wednesday, February 13, 2013

DIY Valentines


We usually don't do anything for Valentine's day, but this year we were invited to a Valentine's Day party (!), so I decided to step outside my comfort zone and make some Valentines!

Madeline and I combed over my Valentine's day Pinterest board and she wanted glowsticks! (What kid doesn't, right?)

There were a couple of examples of the ones with a 'heart' - I decided to make my own in Inkscape (you can have a generic one for free HERE). Some scissors, two hole punches and a glowstick later - voilĂ , homemade valentines!


For Evie's, I came up with something of my very own! Since I usually don't have good paper-craft ideas, I was very excited about this.

All you need is a balloon and a piece of ribbon. One hole punch at the bottom and pull the opening of the balloon through the hole and tie the ribbon around it.


You're probably wondering, "Why Green?!? It's Valentine's Day!" Well, I just happen to have green and white balloons for a little someone's upcoming birthday party and I'm too lazy to go get different ones....

Besides, green's awesome, if you didn't already know.


All that matters is that my baby likes 'em, right? This face says it all.....I think...


The best part? I have printables for this one, too! In many colors! 

Happy Valentine's Day!


 Free Balloon Valentine Printables: Green, Blue, Purple, Yellow, Orange, & Red.

Tuesday, February 5, 2013

Changing Table Refinish

This was our changing table (I had clearly already begun sanding it and then thought 'I should take a before picture...'):


We got it before my first child was born over five years ago.

It's been banged up. The drawers weren't working properly. It was an ugly color. Need I say more?

I found this tutorial on Pinterest about repainting furniture and used it as a guide.

But there were other problems with this dresser that had to be addressed first.

The first thing I did was replace all the drawer sliders for the three big drawers (Lowes).

Then I had to sand everything. The primer I got said you didn't have to sand it, but I did anyway, just to be sure the paint would stick. And since we were using the darn thing at the same time I was doing the refinish, I had to reassemble the dresser as I finished each piece. Needless to say, I'm an expert at taking this thing apart and reassembling....

The next step was the primer - Zinsser 1-2-3 Water-Base Primer is what I used.

Then the paint - Baer - Gem Turquoise 500B-4. I wanted blue but not BOY blue. PS - I love this color.

Then the finish - Minwax Polycrylic.

And finally (finally!) I was done (with a month left in my pregnancy to spare).

We've been enjoying this lovely refurbished changing table for over seven months now! (has it really been that long? Wow.)


Thursday, January 24, 2013

Baklava


If you're looking for delicious holiday treat that only uses a pound of butter, then I have the perfect thing for you!

When the Husband first requested this a couple of years ago for a Christmastime treat, I asked my Mother-in-law what recipe she uses (this was a childhood favorite of my husband). She sent me a link to a recipe by Michael Symon - except(!), she uses a different recipe for the syrup - both of which are found below. I've made this with both walnuts and pistachios - pistachios are my favorite!

Enjoy!

Baklava

(Baklava recipe by Michael Symon. Baklava syrup recipe by Kathy Crapo)


Ingredients

For the Baklava:

  • 1 pound pistachios and/or walnuts, coarsely ground, plus more for garnish
  • 1/2 teaspoon ground cinnamon, or to taste
  • 1 cup ground zwieback crackers or breadcrumbs
  • 4 sticks unsalted butter, melted
  • 40 or so sheets of Phyllo dough (thawed, if frozen)

For Baklava Syrup:

  • 1/3 Cup Honey
  • 1 Cup Water
  • 1 1/2 Cups Sugar
  • 1 Tbsp Lemon Juice
  • Dash of Vanilla
  • Pinch of Salt

Directions

Position a rack in the lower third of the oven; preheat to 350 degrees F. Combine the nuts, cinnamon and ground crackers in a bowl.

Brush a 9-by-13-inch baking dish with some of the butter. Layer 14 pieces of phyllo in the dish, brushing each piece with butter before adding the next (keep the remaining dough covered with a damp towel). Sprinkle a quarter of the nut mixture over the dough (about 1 Cup). Layer 5 pieces of phyllo on top, brushing each with butter before adding the next; sprinkle with another quarter of the nut mixture. Add 5 more phyllo pieces on top, brushing each with butter, then add another quarter of the nut mixture, 5 more pieces of phyllo with butter, and the remaining nuts.

Layer the remaining 11 pieces of phyllo on top of the nuts, brushing each with butter; brush the top piece with extra butter. Cut into the baklava to make strips, about 1 1/2 inches wide. Then make diagonal slices, about 1 1/2 inches apart, to create a diamond pattern. Bake until golden, about 1 hour.

Bring the sugar, honey and water to a boil and cook, 10 to 15 minutes. Add the lemon juice, vanilla and salt and boil 2 more minutes, then let cool slightly.

Pour the syrup over the warm baklava; let soak, uncovered, at least 6 hours or overnight. Garnish with nuts.

Thursday, January 10, 2013

Wheelchair Bag Tutorial


We made these wheelchair bags to take with us for our Activity Days trip to the Pocopson home in December.

Here's a quick tutorial!

What you'll need:

~ A sheet of 8 1/2 x 11 inch paper (This will be your template)
~ Approx. 1/3 yd of Main fabric
~ Approx. 1/3 yd of Lining fabric
~ Thread
~ Sewing machine
~ Scissors

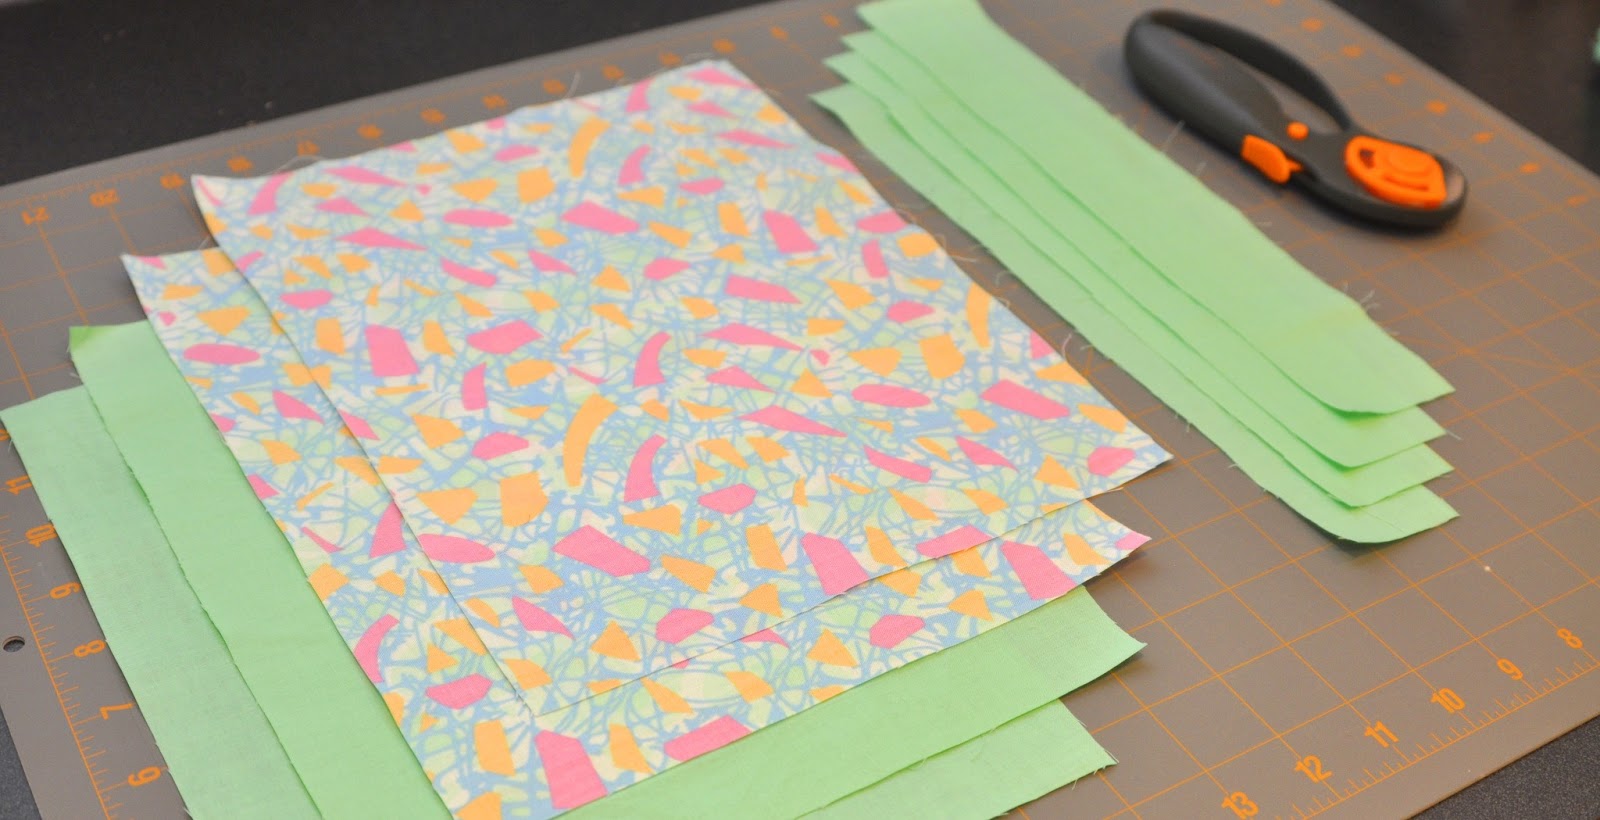
Step 1: Using the sheet of paper as a template, cut out two rectangles from your main fabric and two rectangles from the lining fabric.


(This fabric reminds me of the 90's......)


Step 2: From the remaining fabric (main or lining) cut four strips 2 inches wide x 12 inches long.


Step 3: Straps - Fold fabric strips lengthwise with right sides together.


Starting at the folded side of one end, sew across and down the strip of fabric with a 3/8 inch seam allowance. 


Clip corners and turn inside out. (I used a wooden chopstick for this step...It was a perfect tool.)


Press straps.


 Step 4: Bag - with right sides together, starting with a short side, sew three sides of the rectangle using a 1/2 inch seam allowance. Repeat with the lining fabric.


Press the seams flat near the opening of each pouch.


Clip corners.


Step 5: Turn the sewn lining fabric pouch right side out.


Insert it into the main fabric pouch. 


Sandwich and pin the straps between the main fabric pouch and lining pouch, two at each end. Make sure they're lined up with one another. The length of the strap should be tucked between the two layers. 


Sew around the edge of the bag with a 1/2 inch seam allowance, leaving a 1 inch opening for turning. I also back-stitched at the start and finish AND at each strap for reinforcement (optional, of course).


Step 6: Gently turn the bag inside out.


Stuff the lining inside the bag. Pin or press the edge around the bag opening. 


Sew 1/8 inch from the bag opening around to close the hole. 


Press.


(Demonstrating the bag's use on the girl's shopping cart....)


 Done!


Sunday, January 6, 2013

The Blessing Dress or How I Spent My Christmas Vacation


The Blessing Dress or How I Spent My Christmas Vacation

I know what you're thinking people: Stacy must be sitting on her hands doing nothing, nothing! Or dead. Whichever.

Not so!

I'm totally a lazy blogger though.

Taking pictures.

So much work.

Editing pictures.

So much more work.

Writing.....well, I have been doing that, but more on that later.

Until then, you can read about this lovely blessing dress I made last month...which was clearly not for me. I have a boy, people - who is six months old (can you believe that? No? Me either.).

Why did I agree to this? Well, the story is that back in May, my ward had a cake and service auction to raise money for the youth's summer programs. I made a cake (natch) and offered my services as a seamstress for a little girl. A friend of mine won my services but held off on taking me up on it, knowing that I had just had a baby and not wanting to take up too much of my time. It was always on my mind though and I felt like I just needed to fulfill that obligation ASAP.

I got a call from my friend in November. She said she had the perfect opportunity for me to perform my service - her sister was in need of blessing dress - the blessing was on December 30th.

I was going to spend December in my hometown in Oregon, where I wouldn't have much to do otherwise so I agreed.


My friend's sister directed me to this blog post about a blessing dress she thought was just what she was looking for - the skirt part anyway. That post referenced this tutorial.  The original post never says how the skirt was actually made, so I had to figure it out on my own. It turned out to be a bit more challenging than I had originally thought...

I drafted my own pattern for the bodice (which she wanted to be simple) using the measurements that I'd been given. This baby was premature so she was smaller than any of the patterns I had access to. I drafted my own pattern for the little sleeves as well (I use this tutorial), wanting to keep them light and airy, so I used the same chiffon I used for the ruffles. They were planning to have the baby wear a little sweater over the top of the dress and I wanted to cut down on fabric bulk (I used Taffeta for the bodice and skirt).

(Buttons, my arch nemesis.)


The ruffles were the most challenging aspect of the dress. There are twelve and each had to be hemmed all the way around. Easier said than done. I think the buttons are the scariest part to do, though - you mess those up and you've ruined the whole dress!

Overall, I think the project turned out well - and my friend's sister absolutely loved it!


 Did I mention that I had to make two? Yeah, I made two. Twin dresses for twin baby girls.